How To
XFX 6200 Upgrade For the Cube
Some time ago, my Cube’s original ATI Rage 128 Pro video card needed replacing. Relative to newer models, it ran slower than uphill molasses and supported a limited range of monitor sizes. With the help of folks at CubeOwner, a beefier ATI 7500 Radeon stepped in for the ATI 128 and achieved video bliss—at least for a little while.
Early this year, my long-lived Formac LCD monitor flashed, smoked, and dramatically gave up the ghost. Suddenly, I needed a new monitor. It’s no problem finding a replacement, but the new crop of wide-screen choices made me envious—and the Radeon 7500 couldn’t support a roomy 22-inch model, with 1680×1050 resolution.
When I bought the 7500, you could also find high-powered GeForce3 cards specially modified for Cubes. Unfortunately, they ran close to $200 each. I needed value more than top-shelf performance, so went with the $50 Radeon. It worked for me then, but wouldn’t be enough now.
Time Waits For No Man
Fortunately, technology moves along, even for old computers. In 2007, Cube owners don’t have to settle for the hard-to-find GeForce3 cards. The video card tweaking site Strangedogs, a repository of video card know-how, provided an option I previously thought impossible. Reformat a PC GeForce 6200 for dual-monitor support! DVI output! 1680×1050 resolution! 256 MB of VRAM! Apple’s new Core Image support! An extra supply of exclamation points to describe it all!
I last used multiple displays on my Power Mac 8500, which came ready for two monitors (plus a TV output) if you spent an extra $50 on a whopping 4 MB of VRAM. A decade later, the XFX GeForce 6200 includes 256 MB for the same upgrade cost. This means bigger monitors, such as a typical 22-inch model or Apple’s Cinema Displays.
There’s a very large catch to the nVIDIA XFX GeForce 6200—it’s a PC-based video card that you’re reworking for the Cube (bringing it over from the Dark Side, as some say). This setup requires some special work.
Note: This article describes an actual upgrade, but provides no warranty for your own work. See an Apple Store or customer support if you’re not comfortable opening up the system.
Strangedogs describes how to reformat (flash) the XFX 6200 on their Wiki site, which I summarize below. Use their page as the main reference—my version adds personal context and experience. However, don’t use their ROM software or information for commercial use, as it represents a great deal of personal labor by the volunteers there.
- Purchase the Cube-sized XFX GeForce 6200 model PVT44AWANG (and only this model), probably from eBay or an online reseller (mine cost $50).
- Find a friend with a PC that supports PCI cards (if you don’t have such a PC yourself).
- Make a bootable Windows floppy disk.
- Download the appropriate XFX 6200 ROM file from the Strangedogs Wiki (they have a Cube-specific version that’s slightly under-clocked to run cooler).
- Install the 6200 in the PC and follow the NVFLASH instructions to reformat the card.
- If all worked so far, install it into your Cube.
- If it powers up and shows the Apple icon, rejoice!
Before making this upgrade, I’d already taken apart my Cube several times to replace the motherboard, add a fan, do the Radeon 7500 work, swap the hard disk, add a DVD burner, put in more RAM, install an AirPort card, attach a wireless antenna, and upgrade the CPU twice.
Don’t disassemble your Cube casually! The pieces inside don’t react well to dust, static electricity, or missing components. Ground yourself, organize all parts you remove, and work carefully with instructions. (Adding the 6200 took just as long as upgrading the motherboard for me!)
Cooling vs. Silence (or “Buy a Fan Now”)
Cube owners generally like quiet things, and avoid installing a fan if at all possible. The XFX GeForce runs relatively cool, given its memory and speed—but you will absolutely need a fan to use it. You can get something very quiet that runs on the existing power supply. Buy a fan because a quiet hum is vastly better than your CPU overheating.
The XFX 6200 didn’t come with a fan, but my Cube already had one from a previous CPU upgrade. If yours doesn’t, find a suitable model (this example uses the Panasonic Panaflo).
Finding the Card
You can find the XFX 6200 PVT44AWANG on eBay or at other online stores for $50–60. The XFX 6200 came out recently enough that you should find something brand new. If you’re shopping second-hand, make sure the seller has a dead-on-arrival replacement guarantee!
Doing the PC Work
Putting the video card into a PC allows you to flash its on-board software (or ROM), replacing the PC-friendly version with something the Cube can understand. You spend some important time at a PC keyboard for this upgrade. Make it count by following the Strangedogs upgrade instructions carefully! They cover the main points, so I’ll just add personal notes.
- I used NVFLASH version 4.42, not the latest 5.x version. For some reason, 4.42 flashed the nVIDIA card properly where the newer version reported an error.
- You can create any kind of Windows boot disk, even a CD-ROM disc or USB drive! Just make sure to add the NVFLASH version and ROM files and name them with the 8.3 format (i.e., nvflash.exe and XFX6200.rom), since you’ll be booting into DOS.
- Flashing a ROM seems really intimidating. NVFLASH gives you a bunch of warnings and shows lots of cryptic output. Rest assured it has worked with this video card model, ROM, and Cube!
- This might not work the first time, the second time, or the third time! Don’t be afraid to check the Strangedogs forums and repeat steps when in doubt.
- You need to cover two pins on the video card with tape. This requires a steady hand, a sharp utility knife, and patience.
All this effort makes it extra-satisfying when things ultimately work out. It’s work any PC geek can respect! My optimism aside, the work is still in your hands and my article provides no warranty or guarantee of final performance.
Bracket Surgery
The XFX 6200 already fits in the Cube lengthwise or it wouldn’t work at all. You need to modify the case (or bracket) slightly to fit the width. Start by reading the excellent (and illustrated) Fly-Productions guide to this process.
I chose not to modify the case as shown in Step 1. This leaves you short one DVI port anchor screw, but shouldn’t sacrifice much stability since the Cube doesn’t move around. Fly’s last picture shows the nut you must install to keep the card steady inside.
Installing the Card Itself
Once you flash the card and modify its mounting bracket, it’s time for actual Cube installation. Using all previous precautions, slide out the Cube and remove the top plate screws. Carefully move the plate aside (you shouldn’t have to unplug the on-off switch) to make room for swapping the video cards. Test the fit of the new card, which should go right into place. If a hole doesn’t line up properly, don’t be afraid to rework the 6200’s mounting plate! Rushing through these steps won’t make the card run faster.
Check the placement of the tape on the video card’s pins before it goes in. Should the Cube fail to power up after installation, try re-taping the pins. (I had to do this once—see the Pins 3 & 11 page on the Wiki for the reason why.)
After installation and before reassembly, push and hold the Cube’s CUDA switch for a few seconds (it’s on the corner of the mother board away from all the ports). Apple recommends this after any internal hardware change.
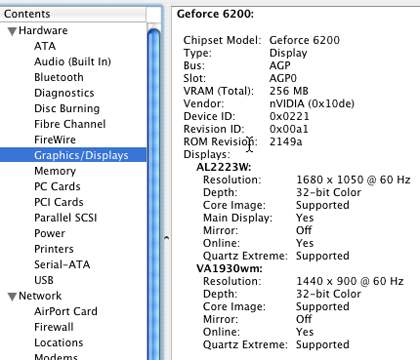
With all that done and the Cube reassembled, I connected a pair of monitors to the DVI and VGA ports. The 6200 promised much better video performance, but running an extended desktop was my real reason for the upgrade. After power up, System Profiler confirmed what I had.

Success!
You should download and occasionally run the Temperature Monitor utility. It’s a piece of freeware that tracks internal temperatures, including the video card. If the system climbs to dangerously high levels (say, 90° C), I’d shut it down to avoid damage. This is particularly important in hot seasons, where you’re well-served to actively cool any room with a computer (you did install a fan, right?).
Card Performance
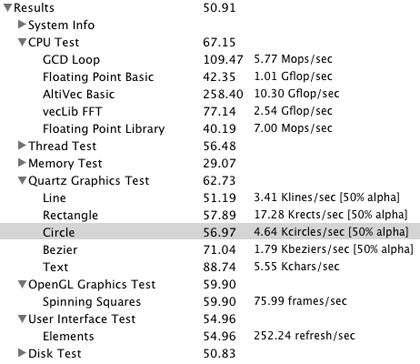
Here’s what the Mac performance software XBench said about my Cube’s 1.3Ghz G4 CPU and new XFX 6200 card running a single monitor.

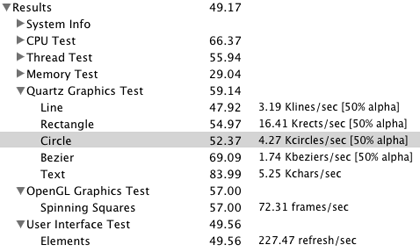
Here’s the same configuration using two monitors, one at 1680×1050 and the other at 1440×900. Performance drops less than 10% compared to the single monitor, which is better than I expected.

The XBench site charts plenty of other Cubes with various configurations. I compared the first dozen or so models with the same CPU speed and noticed a significant performance edge in the Quartz Graphics and User Interface tests. Nothing to write home about, but a nice confirmation of the $50 upgrade hard at work.
Summary
This upgrade turned a piece of affordable PC hardware into a high-level Cube performer. My hands-on experience definitely helped, but it still took persistence, some optimism, and a friend’s computer to make it happen. Anyone with an adequate supply of each should be able to follow the footsteps to large monitor support and snappy video performance.
As the owner of an older Mac model, it felt like a revelation to add DVI and a second monitor. A last thanks to the people at Strangedogs for prepping the XFX 6200 ROM and hosting a support forum for like-minded users.
Also in This Series
- Give Alert Sounds a Little Personality · March 2012
- Create Your Own iPhone Ringtones · February 2012
- Create Your Own Homemade Audio Book · December 2011
- Upgrade to Lion Painlessly · August 2011
- Make the Most of TextEdit · July 2011
- Using the Free Disk Utility on Your Mac · May 2011
- Making Use of QuickTime X · March 2011
- Making the Most of What’s Already on Your Mac · February 2011
- Making the Most of What’s Already on Your Mac · January 2011
- Complete Archive
Reader Comments (3)
Add A Comment