Review: LinuxPPC 2000

Developer: LinuxPPC
Price: $20 (also available as a free download)
Requirements: See below.
The last time ATPM visited the LinuxPPC world, we brought back beautiful screen shots and tantalizing descriptions of life on the open-source command prompt. Or rather, the increasingly Mac-like interface that legions of programmers had built on top of that prompt. A lot of rough edges have been smoothed over since then, and the latest version of LinuxPPC is now easier to install than ever. Join me now as I take a second trip over to the wild side, leaving behind virtually all the comforts and assurances of the Mac OS for a system that offers pure power—but only once you know how to use it.
Before we begin, allow me to come clean: I am not a Linux guru. When disaster strikes, as it frequently does whenever I start tinkering around, I inevitably break something critical and end up re-installing the whole OS. I’ve probably spent more time staring at LinuxPPC’s installation windows than I have doing “real work” inside the system. The following is one part cautionary tale, one part informed sightseeing tour. Its moral is simple: Look before you leap, or you’ll blow up your computer. :-)
Let the Installation Begin
LinuxPPC’s current installation procedure is the best it’s been so far. First, choose your method. You can either download all the files you need via FTP for free—although that will take many hours over a modem—or you can bite the bullet, plunk down $20, and order up a CD-ROM from the LinuxPPC folks. This latter approach makes re-installation a breeze. Trust me, at some point you will need to reinstall. As for the installation, if you can install the Mac OS, you can install LinuxPPC. Just boot off the CD, and the installer will walk you through the rest.
You’ll get your first taste of Linux trickiness when you pick which software packages you want to install. Here’s one thing that hasn’t changed since the previous version, commonly known as R4: there isn’t much description of what the various packages are. Instead, rely on your instincts. If you’re not quite sure what you’re getting yourself into, choose the default installation. If you’re like me, though, pure greed will take over and you’ll want to install every single thing, just to say that you did.
This is a bad, bad idea. Here’s what happened when I did a full install. Roughly 1.5 GB worth of stuff was installed; everything from arcade games to development libraries to networking utilities. One package I’d never heard of failed to install (darn that error 256), and when I re-booted and logged in all the menus were in Chinese. Whoops. Two more installations later, I had solved that problem by omitting the “Language” group of packages. But then I encountered a new problem—KDE, one of the two primary user interfaces provided by LinuxPPC and most other Linux distributions, wasn’t working. After much anguish and another installation, I now have a fully functioning Linux system. Minus Mac on Linux (MOL), which requires me to recompile the Linux kernel. More on that in a bit.
Incremental Progress
|
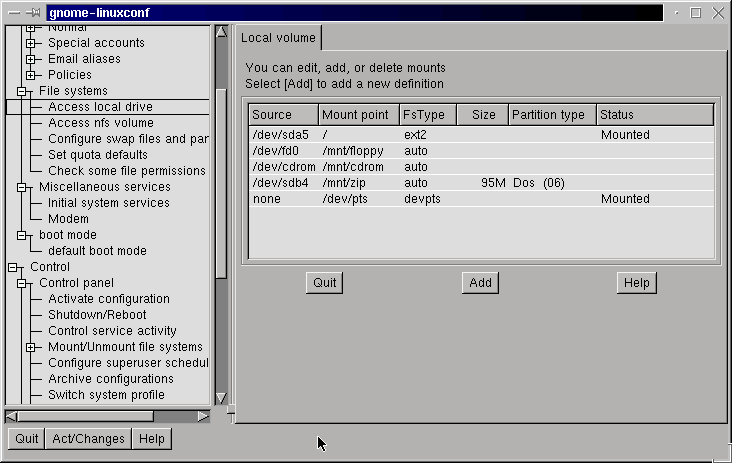
Expect to spend some time with Linuxconf, an all-in-one administration program that lets you access all your system’s settings. |
Solve one Linux problem, and another one will probably pop up a few minutes later. That’s the bottom line with LinuxPPC, and with Linux in general. Efforts to make Linux work on all different kinds of hardware and all different configurations is very much a work in progress, and LinuxPPC is no exception. If anything, bringing Linux onto the Mac in the first place is an extra challenge all its own, and while LinuxPPC 2000 is in leaps and bounds easier to use than its predecessor, there’s still plenty more room for improvement.
For now, your experience with Linux depends largely on the hardware you start out with. The best option, unfortunately, would be to start with an Intel system. This way, you’ll be able to use that special class of Linux software that is freely available but not open source (therefore LinuxPPC programmers can’t make it work on Apple hardware). StarOffice falls into this category. It’s a word processing suite like Microsoft Office or AppleWorks, but it doesn’t work on Apple-based Linux systems. Ditto for many other programs (exception: ApplixWare, a direct competitor of StarOffice, available for LinuxPPC at a $99 cost).
|
The Gimp (show here under the Gnome desktop environment), a Linux equivalent of Photoshop, is one of the many free programs that come with LinuxPPC. |
Many, but not all. While support for Apple-based Linux systems like those running LinuxPPC may not always be a top priority for programmers, plenty of programs will work just fine. The deciding factor is whether you can get your hands on source code, the files that contain raw code which you can compile yourself to run on your particular machine. But even then, it helps to know what you’re doing.
Is My Hardware Supported?
As Linux is under constant and rapid development, and because the needs of Apple hardware are different from Intel hardware, your LinuxPPC mileage will vary depending on what you start with. Brand-spanking new hardware like the iBook and G4 may bring more problems and bugs than older Power Macs, simply because older machines have been around longer. As with all things Linux, things get better over time. When I first installed Linux on my machine (a Power Mac 6500) last fall, support was just coming out for ATI’s Rage 128 chipset. As a result, support for my upgraded video card was initially a slight problem (or, more optimistically, an opportunity to do some heavy research on video drivers). By now, Rage support has become part of the LinuxPPC kernel, and the issue is moot. If you’re thinking of trying LinuxPPC for the first time, do your homework ahead of time. Spend some time over at LinuxPPC.com, and make an inventory of your system. If you’re using all your original hardware, expect fewer compatibility problems.
Welcome to Your Desktop

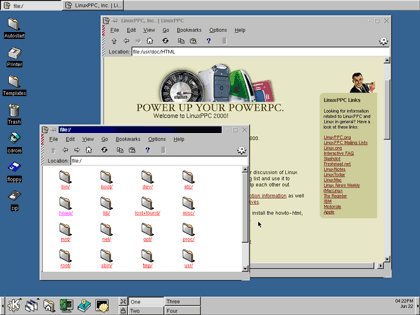
Welcome to KDE. At bottom is the Panel, providing access to all your Linux files. The two windows belong to KDE's file browser—which can also display Web pages.
Once you make it onto the desktop and work through any configuration/compatibility/weird voodoo problems that pop up, you can get down to business—actually using Linux. As mentioned above, LinuxPPC comes with several desktop environments, the two heavyweights being KDE and Gnome.
A desktop environment, for all intents and purposes, defines your interface. Gnome and KDE do the same things, just in different ways; both give you access to the files on your Linux system through a file browser application similar to Windows Explorer, and both use something called a panel to “dock” all the stuff you require fast access to. Coolest of all, your Linux desktop can extend beyond the visible area of your monitor through the use of so-called virtual desktops. Switching between desktops is like switching between active applications.
LinuxPPC defaults to the Gnome desktop environment, but I prefer KDE because it runs slightly faster on my machine. Aside from creating user accounts for yourself (it’s bad practice to continually log into the system as the “root” user, for security reasons), one of the first things you’ll want to do is tell LinuxPPC where to access your stuff. Here, “stuff” can mean a Zip drive, a modem, another hard drive, or the partition you keep your Mac files on (as long as it’s not HFS+). LinuxPPC comes preconfigured to recognize your floppy drive and your CD-ROM drive. For anything else, you need to edit a text file called fstab
(the file system table). There are several ways to do this, but we’ll take the direct approach and open the file in KDE’s equivalent of SimpleText, called Text Editor. Here’s what fstab looks like:
/dev/sda5       /               ext2    defaults        1 1
/dev/sda4       swap            swap    defaults        0 0
/dev/fd0        /mnt/floppy     auto    noauto          0 0
/dev/cdrom      /mnt/cdrom      auto    noauto,users,ro 0 0
/dev/sdb4       /mnt/zip        auto    noauto,users    0 0
Column one tells Linux where each device is located, and column two tells it how to attach the accompanying files onto the main file system. The point here is simply to give you a taste of what you’re in for when you start using Linux. Something that a Mac user might normally consider insignificant under the Mac OS operates under an entirely different set of rules under Linux. By now, we’re dealing with Linux itself rather than specific quirks of LinuxPPC. At this point, once everything is up and running and functional, a good 1000-page Linux manual will get you started on the path to guru-dom. LinuxPPC does an admirable job of making Linux possible on a Mac, but doing something with it once you have it is an entirely different story.
MOL: Mac on Linux
There’s one last feature of LinuxPPC that deserves special attention. MOL is a special fringe benefit that Mac-based Linux users get to work and play with. It’s a special program that allow you to access the Mac OS from a window inside Linux. This is not emulation per se, since the Mac OS is simply being tricked into thinking it’s running normally rather than inside Linux. As a result, performance doesn’t suffer the way it does when you use Virtual PC to emulate Windows from the Mac OS. If you can get it to work, MOL allows you to get the both of best worlds without the annoying tedium of continually rebooting from one OS into the other every time you want to do something new. But that If is a rather big If. In my case, it means re-compiling the kernel with a special patch. Newer processors should be able to use MOL without this extra step, but some amount of creative configuration will have to take place.
Is Now The Time?
Most definitely. If you haven’t tried Linux yet, or have been waiting for the right moment, LinuxPPC 2000 can give you a functioning Linux system on your Mac in one shot, provided you do enough research up front. Even if it takes two or three installs—or more, as in my case—the reward is a fundamentally different approach to using your Mac, whether old or new.


Reader Comments (4)
Add A Comment