Review: Retrospect Express 4.2

Company: Dantz Development Corporation
Web: http://www.dantz.com
Street Price: $45
In 1989 Dantz created Retrospect, the best backup program for the Macintosh. Dantz continues to update and improve Retrospect, keeping it ahead of all its competitors. Retrospect Desktop Backup will perform “power” backups for a single user. Retrospect Workgroup Backup consists of the Retrospect Desktop application and multiple client applications for network backups. Dantz designed Retrospect Express to meet the backup and archiving needs of individual users. RE can backup files from one or more logical drives to numerous media types: compact disks (write-once [CD-R] or rewritable [CD-RW]) and removable cartridges (Jaz, Zip, SyQuest, SuperDisk, DVD-RAM, magneto-optical, or floppy disk). RE also lets you backup to an FTP site over the Internet. RE makes backups easy even for users who have never used a backup program. However, RE does not have the same power and flexibility of Retrospect Desktop Backup 4.2, its more costly (street price $170) and hard-to-find sibling.
RE installs easily from a bootable CD by double-clicking the InstallerVISE application. Less than 5 MB of disk space is needed for a full installation. RE requires at least 2 MB of application RAM. The full manual is an Adobe PDF document of 313 small (6.51" x 5.14") pages designed to be enlarged 20% and printed 2-up on 8.5" x 11" paper. The PDF manual is difficult to read on-screen unless viewed at 125% or larger. Its manual covers only the Macintosh version of RE.
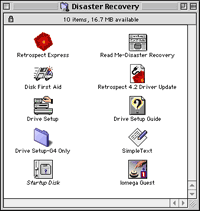 The CD contains installers for Adobe Acrobat Reader 4.05 and for Microsoft Internet Explorer and Outlook Express 4.5. The CD has a “Disaster Recovery” folder with Apple’s Disk First Aid and Drive Setup utilities (the OS 8.6 versions). This folder includes detailed instructions with strategies for recovering from a drive failure.
When you launch RE it displays a window with four tabs: Immediate, Automate, Tools, and Configure. The Immediate window allows you to backup, restore, duplicate a volume (in Finder format), or archive files. The Automate window is where you create and modify scripts. The Tools window allows you to verify or repair existing backup sets. The Configure window allows you to select and setup backup media and set preferences for RE.
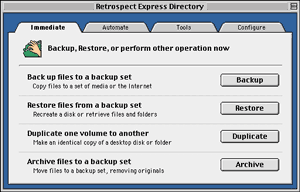
Newcomers to Retrospect should start with the Automate window and click on the EasyScript button. EasyScript asks a series of questions about your backup needs and backup media. It then creates a recommended backup script and schedule.
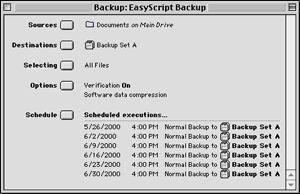
You can amend any of the five components of the backup script: Source (the volumes or subvolumes that contain files for backup), Destination (backup media), Selecting (rules to select or exclude files for backup), Options (backup verification and compression), and Schedule (date, time, and frequency of backups).
RE supports single-destination backups and rotating backups (two or more backup sets that you use in a specified pattern). EasyScript’s default choices for most of the components are good. However, you may not want to use the default choice of “All Files.” This option will generate unnecessarily large backups if the source volume contains applications or your System Folder. RE gives you nine other selection options: “All Files Except Cache Files,” “Applications” (a choice you would rarely use), “Documents” (everything except applications and files in the System Folder), “Documents Folder” (only files in folders titled “Documents” or “My Documents”), “Documents Folder and Hot Items” (above files plus files or folders you label “Hot”), “Exclude Cool Items” (everything except files or folders you label “Cool”), “Hot Items” (only items you label “Hot”), “Retrospect Express Files,” and “System Folder.”
In my experience, very few Macintosh users place all their documents into the “Documents” or “My Documents” folders established by all recent versions of Mac OS. Therefore, most users should choose “Documents” to ensure backup of all user-created files. RE does not allow combinations of selectors such as “Documents” plus “Hot Items” plus “Exclude Cool Items.” You need Retrospect Desktop Backup for this level of file selectivity.
Backup Tips
The backup strategy I recommend for most users is to backup the following files at least once a week: all user-created documents and templates (don’t forget data files created by programs such as Quicken, Personal Record Keeper, Family Tree Maker, etc.), user-modified application preferences and settings (found in the “Preferences” folder or in the same folder as the application), and game files such as high scores and saved games.
How do you do this with RE? I recommend creating a hard drive partition or a folder for all your documents. Move your documents there. (Create aliases and place them in your files’ original locations, if desired.) Launch RE and use EasyScript to select your Documents volume or folder for backup. When EasyScript is done, click on the “Source” button, then on the “Add...” button. A window resembling the Finder’s list view will appear. Select the volume containing your active System Folder and click on the “Subvolume...” button. Scroll down to the System Folder, select it, then click on the “Open” button. Scroll down to the “Preferences” folder, select it, and press the “Enter” key or click on the “Define” button.
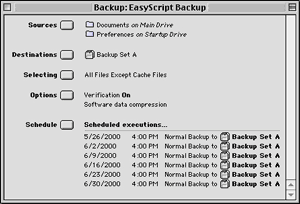
To avoid backing up Web browser cache files, click on the “Selecting” button and choose “All Files Except Cache Files.” Your backup script window should look similar to the one above. RE will automatically launch whenever a backup is scheduled to occur. (You can turn this feature off by clicking the “Preferences” button in the “Configure” window and selecting “Notifications” from the list of choices.)
Back to the Review
RE does allow users to select specific files and folders for backup. This is done by clicking the “Backup” button of the “Immediate” window. You first choose what source to backup. The source can be “Local Desktop” (i.e. all mounted volumes) or any combination of volumes and subvolumes. After your source volumes are selected, the “Immediate Backup” script window will appear. You can use the “Selector” button to choose the appropriate types of files for backup. Clicking on the “Preview” button allows you to select individual files or folders for backup.
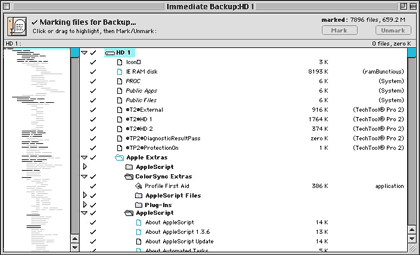
A “browse” window appears with a tree directory on the left and a listing of folders and files in the main window. A check mark appears beside files selected for backup. Initially, all files and folders that meet the “Selector” criteria (such as “Documents”) are marked. You can mark and unmark files individually by selecting them and clicking the appropriate button. You can also toggle the check marks by double-clicking the file name (or anywhere to the left or right of the name). After marking files for backup, close the file browser window and click the “Backup” button. RE asks you to insert whatever media you chose for the backup destination.
Scripted backups (created in the “Automate” window by clicking either the “Scripts” or “EasyScript” buttons) appear in RE’s “Run” menu. They can be executed at any time. The most recently created immediate backup is what appears the next time you click the “Backup” button in the “Immediate” window. Other “Immediate” backups can be reloaded by using the “File” and “Open” menus or by navigating to the “Configure” window and clicking the “Backup Sets” button.
Restoring
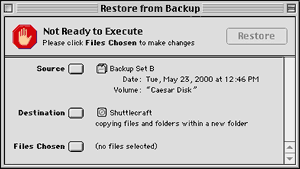
A key criterion for evaluating a backup program is the ease of restoring lost or damaged files. Clicking the “Restore” button in RE’s “Immediate” window displays three choices: “Restore an entire disk,” “Restore files from a backup” (specified files from one backup set), or “Search for files and folders” (among any or all of your backup sets). After choosing one of the three options, you must select which “SnapShot” backup set contains the files of interest. (If you chose the “Search for...” option, you can select multiple SnapShots.) You next choose where the restored files will go. Finally, you click the “Files Chosen” button in the “Restore from Backup” window to select the files, folders, and volumes of interest. RE will tell you which media to insert and will recover all your files to the location you specified.
RE’s Archive function copies selected files to the media you choose, creates an index of the archived files, and (if the “Move files” option is selected) deletes the original files. RE considers an archive file to be a backup, so you can restore files from an archive as described above.
RE can help you recover from major drive problems. Here is a disaster scenario: the hard drive containing all your documents gets totally destroyed. You have been using RE diligently and have a current backup on removable cartridges. However, your backup catalog was on the destroyed hard drive! RE can still restore all your files and folders. In the “Tools” window, click on the “Repair” button. A dialog window appears with four radio buttons. Choose the option “Recreate from removable disks.” RE will ask you to insert your backup disks in order. RE will recreate your backup catalog file. You can use the recreated file to restore your files and folders to a new drive.
RE has numerous other features and options. These are fully described in the PDF manual. RE also has a live help system consisting of Internet Explorer HTML files. Dantz chose not to use Help Viewer from Apple Computer, even though Help Viewer specifically was designed for online help files and requires only 2,000 KB of RAM. The help file topics include: “Restoring,” “Troubleshooting,” “Common Questions,” “Error Messages,” and “Technical Support.” The help window also has links to Dantz’s Retrospect Web site.
Conclusion
Retrospect Express will meet the backup needs of nearly all individual Macintosh users. Users with complex backup requirements should consider purchasing the full-feature Retrospect Desktop Backup program.
RE Pluses
- Supports nearly all removable disk media.
- Simple to use once backup strategies have been defined.
- EasyScript helps to design backup strategies.
- Optional compression decreases size of backup and archive files.
- Optional verification ensures safe backups and archives.
RE Minuses
- Cannot backup to tape or to another hard drive (need Desktop version).
- No combinations of backup selection criteria (need Desktop version).
- No DES encryption (need Desktop version).
- You must organize your files to fit the selection limitations of RE.
- Cannot backup or archive in Finder format (but volumes can be duplicated in Finder format).
Reader Comments (5)
As a last resort, you may be able to recover some data by using a file recovery utility to make a copy of the Retrospect Data file located on the backup media. If you recover this file to your hard disk, copy it to a new, empty removable, name the new removable identically to the old one, and then use Retrospect's Tools:Repair function to recreate a backup set catalog from the media (when prompted, save the catalog in a different place than your original backup set catalog). You may be able to retrieve more files from the recovered set after the rebuild. This is a last resort, and often does not yield more than the original disk, however.
Add A Comment